Tuesday, September 25, 2012

Nail Art Challenge: Day Ten: Recreate your Favorite

I made it, guys! I survived ten whole days of painting my nails!
I really enjoyed it, but I can honestly say that I'm glad it's over. It really took a bunch of my time and I had to plan everything around painting my nails.But I finished! So hooray!
There's also a challenge going on right now to see who wins a prize from Erica. If my picture for day ten gets the most likes, I win, so it would mean SO MUCH to me if you'd follow this link and 'like' my picture. 


So here are all of the prompts, one more time. If you'll recall, I had a terrible time with my favorite season mani on day three, so that's what I decided to do for day ten. Instead of painting a tree on every nail (although I swear they looked like cacti more than trees) I painted one on just the pinkie.


So I was all finished with the design but hadn't taken a picture yet when BAM! The tip of my middle finger's nail broke off. It was hanging by a thread when I noticed, so I put a band-aid on it until I get get hold of some nail glue. I glued it back together as best I could and repainted it but it's still a tad noticeable.


What do you think about this one? I'm really happy with how it came out! I wish that I'd smeared the gradient together to make it less sponged-on-looking and more smooth like an actual sunset, but that's my only complaint.

I used a whole bunch of polishes for this design:
Base coat: Beauty Secrets - Ridge Filler
Pink: Sinful Colors - Boom Boom
Orange: Sally Hansen - Sun Kissed
Yellow: Sally Hansen - Lightening
Dark Blue: China Glaze - First Mate
Light Blue: China Glaze - Secret Peri-wink-le
Sand background: Essie - Sand Trapez
Sand detail: China Glaze - Harvest Moon
Brown: Essie - Little Brown Dress
Dark Green: Sinful Colors - Envy
Light Green: Essie - Mojito Madness
Black: Sally Hansen - Black Heart
Top coat: Sally Hansen - Strengthening top coat

There you have it! And again, please (please) help me out by going to  this link and 'liking' my picture - it will mean the world to me if I win! Don't forget to follow Muffin Nails here, on Facebook, and on Twitter, and please thank Erica's Nails and More for this amazing challenge! Thanks for reading!

Sunday, September 23, 2012

Nail Art Challenge: Day Nine: French Tip Variant

Day nine! Time flies, doesn't it? I Must say, I've definitely enjoyed this challenge, but I think I'll be happy when it's done. Planning my life around painting my nails has been really stressful!


French tips! I was totally stumped for today. I love doing french tips, but I really had no ideas as to what to do to make it a "variant." I decided to look through my untried polishes and found *dun dun dun dun* Electrify!


Electrify is a magnificent glitter polish by China Glaze that was part of their Hunger Games line. I've never been a huge glitter gal, so I thought it would be nice to try something different today by using this one.


I don't have much else to say about this one. Getting the little gems on was quite the hassle, but I think it was worth it. I was going to put smaller ones along each of the nails' tips but I couldn't find any tweezers and they were too small to apply by hand.


I used:

Base coat: Beauty Secrets – Ridge Filler
Red: Sinful Colors - Gogo Girl
Glitter: China Glaze - Electrify
Top coat: Sally Hansen – Strengthening Top Coat

And  that's about it! To see tomorrow's final post for Erica's Nails and More's challenge, follow Muffin Nails here, on Facebook, and on Twitter. Thanks for reading! 
- Muffin

Saturday, September 22, 2012

Nail Art Challenge: Day Eight: Galaxy Nails

A long time ago, in galaxy far, far away…
It was day eight of the nail art challenge, galaxy nails.


I really love the whole galaxy nail thing. These were the ones I was most worried about at the beginning of the challenge, and I found them the easiest out of everything I've done so far.


I really had no idea where to start with these, so I used Cutepolish's Galaxy Nails tutorial to guide me. I switched some things up a little bit to suite my taste, and taa-daa!


My favorite change was, instead of using a regular boring black base, using China Glaze Smoke and Ashes. If you haven't seen this polish before, it is the most beautiful color ever. It's a black polish stuffed with blue and green glitter. If you don't own it yet, quick! Run to a store in a galaxy near you and grab it!


After I painted that as the base, I sponged on white, yellow, and pink, and then the blue to mix together the yellowy part and the black. I used a toothpick to dot on the white stars, and covered it all with a glittery polish. Pretty much what Cutepolish does in her video. Smoke and Ashes doesn't really show up too well underneath everything, which stinks, but I think it adds a little color to it all.


Hehe. Get it? Yoda. And the galaxy nails.
Oh, why do I even bother trying to be funny? I still get a kick out of this picture for whatever reason, though.


And I included this unfocused picture just to show you all the glitter-y-ness of it all. What do you think?

I used:
Base coat: Beauty Secrets – Ridge Filler
Glittery Black: China Glaze – Smoke and Ashes
White: Sally Hansen – Hard to Get
Yellow: Sally Hansen – Lightening
Pink: OPI – Steady as she Rose
Blue: China Glaze – First Mate
Glitter: Sally Hansen – Strobe Light
Top coat: Sally Hansen – Strengthening Top Coat

If you think this design was out of this world (heh), please remember to follow here, on Facebook, and on TwitterDon't forget the lovely Erica's Nails and More at her blog and on Facebook. Feel free to comment about all of my terrible space jokes, or about anything else you have to say! 
- Muffin

Friday, September 21, 2012

Nail Art Challenge: Day Seven: Flowers

Day seven! Wow. Time is really flying isn't it? Here's where we are on the ten day challenge:


Flowers! I love flower nail art because there are just so many directions you can go. I usually stick with the usual five-dots-and-one-dot-in-the-middle flower,  but I wanted to try something out of my comfort zone today. And so I give you: My flowers!


Honestly, I'm not sure if there are even any flowers out there that look like this. But oh well, it couldn't be perfect.

I had a little smudging on the polka dots on the pinky - I'd started out with them as leaves, but I didn't like how they looked, so I attempted to turn them into polka dots. If I did this design again I would make the entire background green with the flower on top.


I started out by making three little petals with the dark pink on each finger. I painted with a lighter pink on top of that, added a little more of the darker pink, and outlined everything with black. I also added some yellow dots for the center of the flower because I just felt like it was missing something.


I feel like the tea bag nail patch on my finger was really noticeable in this design. I tried covering it up with a skin-toned polish but it didn't work all that well *sigh*


So for this design I used:
Base coat: Beauty Secrets Ridge Filler
Dark pink: Sinful Colors - Boom Boom 
Light Pink: OPI - Steady as she Rose
Black: Sally Hansen - Black Heart
Yellow: Sally Hansen - Lightening
Green: Essie - Navigate Her
Top coat: Sally Hansen - Strengthening top coat

Thanks for reading, guys! Make sure to see my posts for the next three days by following here, on Facebook, and on Twitter. And of course, don't forget to follow the amazing host of this challenge, Erica's Nails and More, at her blog and on Facebook!
- Muffin

Thursday, September 20, 2012

Nail Art Challenge: Day Six: Polka Dots

Hey, guys! Ready for some polka dot nail art? I sure am!


Polka dots are just so fun and cheerful, aren't they? I was pretty excited about this one because I'd had an idea for something I hadn't really done before.


So basically, I painted on the tan base color, dotted on the green, pink, and orange, and placed smaller dots of the tan on top to make a ring look. I don't think it turned out quite like I expected, but I'm not too upset with it.


Hey look! It matches my nail file! Sort of.

I used:
Base coat: Beauty Secrets Ridge Filler
Tan: Essie - Sand Trapez
Pink: Sinful Colors - Boom Boom
Green: Essie - Mojito Madness
Orange: Sally Hansen - Sun Kissed
Top coat: Sally Hansen - Strengthening top coat

Thanks for reading! As usual, if you liked this post and want to see more, go ahead and follow here, on Facebook, and on Twitter. And head on over to Erica's Nails and More on her blog and on Facebook to follow/like and thank her for this awesome challenge!
-Muffin

Wednesday, September 19, 2012

Nail Art Challenge Day Five: Gradient

Day five already? I can't believe I'm halfway done! This has been such a fun experience so far!


I just love gradients. If you recall my my very first post, you'll see that I did a gradient. So I always have so much fun painting gradients because it just brings back so many memories, and it's funny seeing how much I've improved since that post. So here's the gradient I did for today. Can you believe just a couple months ago I thought this was crazy difficult nail art magic mumbo jumbo?


I decided to perk up the typical gradient with a braided pattern on top. I think it turned out pretty well!


I used:
Base coat: Beauty Secrets Ridge Filler
Pink: Sinful Colors - Boom Boom
Green: Essie - Mojito Madness
Stripes: White Art Deco Striper
Top coat: Sally Hansen - Strengthening top coat

let me know what you think about this one in the comments! The braids were really simple and fun, so I think I might do a tutorial on this one after the challenge is over.
Please follow here, on Facebook, and on Twitter to see the rest of the challenge. And don't forget to follow Erica's Nails and More... we wouldn't have this awesome challenge without her!
Thanks for reading! 
Muffin

Tuesday, September 18, 2012

Nail Art Challenge Day Four: Saran Wrap Nails

Hello all! So I've made it to day four of Erica's Nails and More's nail art challenge!


I was going to make a post for day three, but I got home late yesterday and had all these other troubles with the mani and really wasn't satisfied with it. I'll post the picture, though.


I am just so annoyed with this. I have about a bazillion complaints about it, and if I had the time I'm sure I would write them all out.

But anyway, we all have those ideas that don't work. I'm going to move on to today's design, which I love much more.

The prompt for day was saran wrap nails, and I've been really excited for this one. I hadn't tried this technique out before now, and I was dying to do it. Here you go!


I just love this whole saran wrap thing so much. My friend said it looks like a lava lamp, and I totally agree.

My index finger was painted with orange as the base and pink on top, and the other fingers were the reverse of that.

Ready to drown in a sea of photos?


I saw DreamyMM Nails and Makeup's design in the day four album and decided to add some little sparkly bead things as well just for the fun of it.


Here are the colors:
Base coat: Beauty Secrets Ridge Filler
Pink: Sinful Colors - Boom Boom
Orange: Sally Hansen - Sun Kissed
Top coat: Sally Hansen - Strengthening top coat

I hope you enjoyed reading about this mani as much as I enjoyed painting it!
If you want to see the rest of the ten day challenge, don't forget to follow here,on Facebook, and on Twitter. And of course, Erica's Nails and More on her blog and on Facebook!
 - Muffin

Sunday, September 16, 2012

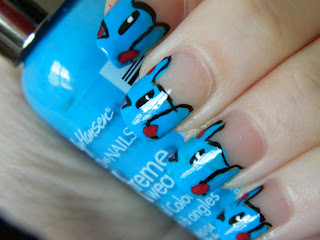
Nail Art Challenge Day Two: Favorite Animal

Happy Sunday, guys! And welcome to my post for day two of the nail art challenge by Erica's Nails and More.


So today's prompt is 'favorite animal.'
If you know me, you know I love elephants. They are so amazing and wonderful and cute and majestic and all sorts of other things. But if you know that I love elephants, you probably also know that I love Pokemon. And what would be better than combining the two?

I did just that with this design. It's of my favorite Pokemon, Phanpy, which just happens to look a whole lot like an elephant.

I really wasn't sure how to approach this design, so I spent a lot of time planning it out. I had a general sort of idea about what I wanted to do, but I used this design design by Adventures in Acetone to help me figure out the shape a little bit. I drew it out a few times on an index card, and then I finally got around to trying it on my nails!

If you've never seen a Phanpy before, this is what one looks like:
Here's where I found this picture

And here are my nails!


I was really worried at first that this would be one of those ideas that totally failed, but I think it went pretty well for my first try. Once the challenge is over I'm going to work on this a bit and see if I can improve it.

Close-up


From another angle.

Even Phanpies (is that the plural?) love cutical cream!

My attempt at being creative for the day.

Here are all of the polishes I used:
Base coat: Beauty Secrets Ridge Filler
Cover-up for the patch on my middle finger: OPI - Passion
Blue: Sally Hansen - Blue Me Away!
Red: OPI - Cajun Shrimp
Black striper: Stripe Rite Black
Top coat: Sally Hansen - Strengthening Top Coat

There you have it! If you'd like to see the rest of my designs for the ten-day nail art challenge, please follow here, on Facebook, and on Twitter. And don't forget to follow Erica's Nails and More on her blog and on Facebook!
Thanks for reading!
- Muffin